
Meta tags are snippets of HTML code that furnish search engines with crucial information regarding a webpage. They assist in determining how a page is displayed in search results, affecting both rankings and click-through rates.
Think of them as labels on a filing cabinet – organising and categorising content so it’s easily discoverable.
In the following sections, we’ll be showing you the SEO meta data basics:
- Breaking down the most important meta tags
- Showing you how to use them properly
- Step-by-step guides for Shopify and WordPress.
What is a Meta Tag?
Meta tags are snippets of HTML code that offer search engines vital information about a webpage. They assist in determining how a page appears in search results, impacting both rankings and click-through rates.
These tags provide important information (meta data) about the page’s content, structure, and purpose – but they’re not visible on the page itself. Instead, they sit in the <head> section of the HTML and communicate directly with search engines like Google.
Meta tags play a key role in SEO by helping search engines:
- Understand the page’s topic and rank it accordingly.
- Decide what to display in search results (title, description, etc.).
- Control indexing (whether a page should appear in search results).
- Manage how search engines crawl your site (e.g., preventing duplicate content issues).
Google supports 10 different types of meta tags:
- description – usually visible underneath the title tag in the search results, and is a brief description of the page.
- robots – meta robots tags affect how search engines interact with each page. For example, you would use index and follow on a key product category page.
- googlebot – does the same thing as meta robots tags, but is specific to Google instead of all search engines.
- notranslate – This tells Google to stop automatically translating your page when it appears in the search results.
- nopagereadaloud – Tells Google not to read the content aloud when a user uses Google’s TTS (text-to-speech) services.
- google-site-verification – Case-sensitive tag that verifies you own a particular site on Google Search Console
- Content-Type and charset – Tells search engines the page’s content type and character set.
- refresh – Often called meta-refresh, this tag sends the user to a different page after a certain amount of time has passed.
- viewport – gives the browser instructions on how to render and display a page on mobile devices.
- rating – tells search engines that this page includes explicit content.
Meta Title (Title Tag)
The meta title (also known as the title tag) is what appears as the clickable headline in search results. It’s one of the strongest ranking factors in SEO and plays a huge role in click-through rates (CTR).
Think of it like the headline of a news article – if it’s boring, too vague, or cut off, people will scroll right past it.

Note: Google sometimes rewrites your title tag if it deems it to be:
- Too long
- Repetitive
- Keyword Stuffed (using keywords unnaturally to try and gain an advantage)
Best Practices for Title Tags:
1) Keyword Targeting
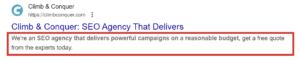
Make sure to include the keyword you want that page to appear for in the search results. For example, you can see in the image above we’ve targeted “SEO Agency” because we want to rank for this term. Do note that there’s more to title tags when optimising a page for the search results, like on-page SEO and content writing.
2) Search Intent
Search intent (also known as user intent) refers to the reason behind a user’s search query. In SEO, understanding search intent is crucial because it helps you create content that aligns with what users are actually looking for.
There are 4 main types of intent we generally see:
- Informational Intent – People are looking for information. For example, you are reading this blog because you want to learn about meta tags in SEO, right?
- Navigational Intent – The user wants to find a specific website or page. For example, “Instagram Login”.
- Transactional Intent – The user is ready to buy. For example, “Sofa beds for sale”.
- Commercial Intent – The user is researching different options before making a decision. For example, “Best Running Shoes for Men”
3) Length
We recommend keeping your title tags below 60 characters. This is because if a title tag is over 60 characters, it is often truncated due to Google’s maximum display limit of 600 pixels.

4) Make it engaging & compelling
The title tag is one of, if not the main reason, why most people click on a page. You’ll find that competitor pages often have very similar, if not the same, title tags. The key to getting a user to click on your page over a competitor is ultimately making it stand out with a unique selling point (USP) or call to action (CTA) – this is called CTR optimisation.
Below is an example from one of our clients, Mallet London. You can see in the image that most of the title tags are quite similar, but one stands out from the rest…

5) Avoid using the same title tag
If multiple pages have the same title, search engines get confused about which one to rank unless it is specifically told which page to index by a canonical tag. This is often referred to as “keyword cannibalisation”, where multiple pages on your site are competing against each other for rankings.
How To Add a Title Tag to Your Page
If you prefer to do stuff the old-fashioned way, here’s a line of code that you can use to implement the title tag, just copy it into the <head>:
<title>Name of Your Title Tag Here</title>
For WordPress:
If you haven’t already, install the Yoast SEO plugin.
- Log in to your WordPress Dashboard.
- Go to Pages or Posts and select the one you want to edit
- Scroll down to the Yoast SEO meta box.
- Enter your new title tag in the “SEO title” field.
- Click “Update” or “Publish” to save the changes.
Note: You can remove the variables (title, page, separator, site title).
For Shopify:
1. Log in to your Shopify Admin Panel.
2. Navigate to:
-
- For the homepage: Go to Online Store > Preferences.
- For product pages: Go to Products and select the specific product.
- For collection pages: Go to Products > Collections and select the specific collection.
3. Scroll down to the “Search engine listing preview” section.
4. Click on “Edit website SEO”.
5. Enter your title in the “Page title” field.
6. Click “Save” to apply the changes.
Meta Description
A meta description is a short summary of a webpage that appears below the title tag in search results (image below). While it doesn’t directly affect rankings, a well-written meta description can boost click-through rates (CTR).
Think of it like a mini sales pitch for your page:
- If it’s compelling, users click.
- If it’s boring, they scroll past.
- If it’s missing, Google auto-generates one (often pulling random text that may not be ideal).
Best Practices For Meta Descriptions:
1. Keep it below 160 characters
Google typically displays around 150-160 characters of a meta description before cutting off the rest (…) – if your description is too long, the most important part might get truncated (a CTA or USP, for example). On the other hand, if it’s too short, you may miss the opportunity to provide enough useful information, although a short meta description isn’t an issue at all if it’s a good one. Take the image above for example, that meta description is only 117 characters long, but does a good enough job of getting the user to click on the page.
2. Make It Engaging
A good meta description should feel like a call to action and prompt the user to click on the page. Instead of simply summarising the page, use USPs or CTAs that give the user a reason to click on your page instead of a competitor’s page.
3. Include Relevant Keywords Naturally
Google doesn’t use meta descriptions as a direct ranking factor, but that doesn’t mean keywords aren’t important. When someone searches for a term that appears in your meta description, Google may bold those words in the search results (see image below). One thing we strongly recommend not doing is keyword stuffing, which is basically trying to force too many keywords into the meta description, meaning it’ll make the meta description look unnatural and spammy.

4. Answer the User’s Search Intent
A great meta description directly answers the user’s search query. If someone is looking for “best running shoes for beginners,” they don’t just want a vague description of running shoes, they want confirmation that your page provides exactly what they want.
Your meta description should match the search intent and reassure users that clicking your page will give them the desired answers.

How to Add a Meta Description to Your Page
Paste the following line of code into the <head> of the page:
<meta name=”description” content=”meta description goes here.”>
WordPress:
- Log in to your WordPress Dashboard.
- Edit the page or post you want to optimise.
- Scroll down to the Yoast SEO meta box.
- Click on Edit Snippet.
- Enter your optimised meta description in the “Meta description” field.
- Click “Update” to save changes.
Shopify:
For the Homepage
- Go to Online Store → Preferences.
- Scroll down to the Search engine listing preview section.
- Click on Edit website SEO.
- Enter your meta description in the “Description” field
- Click “Save” to apply the changes.
For product or collection pages:
- Go to Products or Collections.
- Select the product or collection you want to edit.
- Scroll down to the Search engine listing preview section.
- Click on Edit website SEO.
- Enter your optimised meta description and click Save.
Robots Meta Tags
The robots meta tag is an HTML directive that tells search engines how to crawl and index a specific webpage. Unlike other meta tags that influence rankings or click-through rates, this one controls search engine behaviour, making sure that only the pages you want indexed appear in the search results.
For example, you might have thank-you pages, or internal admin pages that you don’t want Google to index. The robots meta tags allow you to tell search engines to:
- Index or noindex – Decide whether a page should appear in search results.
- Follow or nofollow – Control whether search engines should follow and pass link equity to links on the page.
You can combine the 4 above meta robots tags in the following ways:
<meta name=”robots” content=”noindex, nofollow”>
<meta name=”robots” content=”index, follow”>
<meta name=”robots” content=”noindex, follow”>
<meta name=”robots” content=”index, nofollow”>
Best Practices for Robots Meta Tags
1. Only Use Noindex for Pages You Want to Hide from Search Engines
The noindex directive tells Google not to include the page in search results. This is useful for a few things, including:
- Private content (e.g., login pages, staging sites, etc.).
- Thank-you pages (e.g., after a user submits a form).
2. Use Nofollow to Prevent Passing Link Equity on Certain Pages
The nofollow directive tells Google not to follow links on a page, meaning that link equity won’t be passed to the linked pages. This is useful if:
- You have sponsored or affiliate links that you don’t want to count towards rankings.
- You have user-generated content where links might not be trustworthy.
How to Add Robots Meta Tags to Your Page
WordPress (Using Yoast SEO Plugin):
- Edit the post or page you want to control indexing for.
- Scroll down to the Yoast SEO meta box.
- Click on the “Advanced” tab (⚙️ gear icon).
- Find the “Allow search engines to show this Page in search results?” option and set it to “No” (for noindex).
- Find the “Should search engines follow links on this Page?” option and set it to “No” (for nofollow, if needed).
- Click Update to apply changes.
Shopify:
- Go to Online Store → Themes.
- Click Actions → Edit Code.
- Find the robots.txt.liquid file
- Locate the <head> section.
- Add your disallow rules here (e.g. Disallow: /tag/ – this tells search engines to not index any pages that have /tag/ in the URL)
Meta Viewport
The viewport meta tag is an important HTML element that controls how a webpage is displayed on mobile devices. Without it, websites often appear zoomed out, misaligned, or difficult to navigate on smaller screens.
This tag tells browsers how to scale and adjust the layout so that pages look good on smartphones, tablets, and other mobile devices. With Google’s mobile-first indexing, where mobile usability directly affects rankings, making sure that a site is fully responsive is essential for SEO.
Best Practices for Meta Viewport
1) Use the Standard Responsive Viewport Setting
The most widely accepted best practice for mobile responsiveness is to use the following viewport meta tag:
<meta name=”viewport” content=”width=device-width, initial-scale=1.0″>
2) Avoid Setting Fixed Widths
Some older sites used a fixed width, which can break mobile responsiveness. Avoid using settings like:
<meta name=”viewport” content=”width=1024″>
This forces the page to render as if it’s always 1024 pixels wide, making it appear too small or too large on different devices.
3) Don’t Disable User Zooming
While it might seem useful to prevent users from zooming, Google recommends enabling zoom for accessibility. Some developers disable zoom using:
<meta name=”viewport” content=”width=device-width, initial-scale=1.0, user-scalable=no”>
This can be frustrating for users, especially those with vision impairments who rely on zoom functionality. Instead, keep zoom enabled by not including user-scalable=no in your settings.
4) Test Mobile Friendliness
Even if you add the viewport meta tag, it’s essential to test it to make sure it’s working as intended. Google’s Mobile-Friendly Test tool helps identify issues related to:
You can access the tool here: Google Lighthouse.
How to Add Meta Viewport to Your Website
Most, if not all, of themes and CMS’s set the viewport automatically – so a viewport-related issue is uncommon on modern sites. However, you won’t know if you have a viewport issue if you don’t test your site’s mobile friendliness using Google Lighthouse.
Meta Charset
The meta charset tag is an HTML element that defines a webpage’s character encoding. It ensures that browsers display text correctly and prevents issues with special characters, symbols, and different languages.
Today, the most commonly used charset is UTF-8, which supports nearly all languages and special characters. If your site lacks a proper charset tag, some search engines and browsers may default to an outdated encoding.
Best Practices for Meta Charset
1) Always Use UTF-8 Encoding
UTF-8 is the recommended character encoding because it:
- Supports over 140,000 characters from nearly all written languages.
- Ensures special symbols and accented characters display correctly.
- Is the default encoding for most modern browsers and search engines.
Here’s how to implement it in the <head>:
<meta charset=”UTF-8″>
2) Make Sure the Charset Declaration Appears Early in the <head>
Browsers read HTML from top to bottom, so the charset tag must be one of the first elements in the <head>. If placed too late, some browsers may fail to interpret text correctly before they reach the declaration.
How to Add the Meta Charset Tag
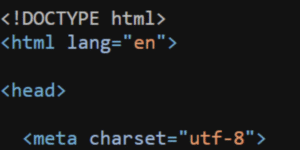
For HTML 5:
<meta charset=”UTF-8″>
(If you’re not sure which version of HTML your site uses, open the source code and check for <!doctype html> – if it uses HTML 5, then it should be in there).
Need Help Optimising Your Meta Tags & On-Page SEO?
Meta tags might seem like a small part of SEO, but they have a big impact on how search engines understand and rank your website.
If your site has missing or poorly optimised meta tags, search engines may struggle to correctly understand your content. This can lead to lower rankings and missed traffic opportunities – even if you have high-quality content on the page.
At Climb & Conquer, we specialise in technical and on-page SEO, so if you’re unsure whether your meta tags are set up correctly, now is the time to act. We’ll audit your site, implement the right fixes, and ensure your pages are fully optimised for search engines and users alike.
Get In Touch
Final Thoughts
In this article we’ve covered the SEO meta data basics, including how meta tags play a very important role in technical SEO, and how they can influence how search engines crawl, index, and display your website. While some meta tags directly impact rankings (like title tags), others improve click-through rates (CTR), and user experience.
Meta tags are one of the easiest SEO elements to fix, but many businesses still get them wrong.
Looking for experts to help fix your website’s meta tags? Our SEO agency specialises in technical SEO.